其他功能
产品比较
产品比较工具允许网站访客基于产品 属性 比较产品。客户可以点击此按钮来选择他们想比较的产品,然后点击 比较 窗口的底部的 比较 按钮,查看比较摘要。

此按钮可以在网站不同部分独立启用:
进入产品页面,打开网站编辑器,转到 样式 选项卡,导航到 产品详情 部分,并切换 比较 按钮。完成后,它将出现在每个具有属性的产品页面上。
要在 商店页面 中显示 ( 比较 ) 按钮,请打开网站编辑器,转到 样式 选项卡,并单击 产品设计 部分的 ( 画笔 ) 图标。在 操作 部分,切换 ( 比较 ) 按钮,并选择 内联 或 悬停 。
Note
你只能同时比较四个产品。
Tip
定义 属性类别 ,将相似的属性分组到同一部分中,便于比较产品。
收藏夹
( 加至收藏 )按钮允许客户将产品添加到收藏夹,即保存它们供以后使用。默认情况下已启用,并出现在每个产品页面上。
此按钮可以在网站不同部分独立启用:
进入产品页面,打开网站编辑器,转到 样式 选项卡,导航到 产品详情 部分,并切换 收藏 按钮。完成后,它将出现在每个产品页面上。
To display the (Wishlist) button on the shop page, open the website editor, go to Style, and click the (paint brush) icon next to Product Design. In the Actions section, toggle the (Wishlist) button and choose between Fixed and Fixed - On Hover.
To display the (Wishlist) icon in the header, open the website editor, click the header, navigate to the Show/Hide Elements section, and toggle the (Wishlist) icon next to Show Empty. If it is not enabled, the wishlist icon only appears when an item has been added to the wishlist. The number of items in the wishlist is also displayed next to the icon.
Wishlist page
It is possible to customize the layout of the My Wishlist page. To do so, open the website editor while on the wishlist page, and in the Style tab under the Wishlist Page section, choose a Products Design. Depending on the selected design, adapt the layout according to Desktop or Mobile devices. Click the (paint brush) icon next to Products Design to access more customization options.
Tip
Customers can move products from their cart to their wishlist by clicking the Save for later button in the Order summary checkout step.
On the My Wishlist page, customers can move products from their wishlist to the cart.
产品亮点
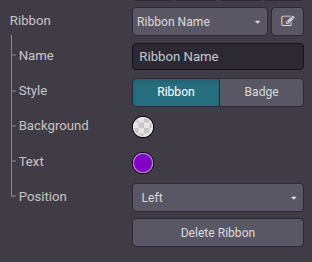
The eCommerce app allows you to highlight products to increase their visibility. To do so, go to . You can either use one of the preconfigured ribbons (Sold out, Sale, Out of stock or New!) or create a New one. Add a ribbon name, and select the method to Assign it:
Manually: assign the ribbon manually.
On Sale: the ribbon is displayed when the product is on sale, e.g., when using a comparison price.
When New: the ribbon is displayed when a new product is added. Specify the number of days after publication it should be displayed.
when out of stock: the ribbon is displayed when the product is currently no longer available.
Choose its Position, either Left or Right, and a Style, either Ribbon or Badge. Define the Text Color and the Background Color. Then Save. The ribbon is now available for all the e-commerce products.
Tip
There are other ways to create a new product ribbon:
Access the product form, and under the Sales tab, change or create the ribbon in the Ribbon field.
Edit/create ribbons from the website editor. To do so, go to the Style tab, and navigate to the Product Details section. Click the green (Create) icon next to the Ribbon field or the (Edit) icon next to the Ribbon label. The Assign feature is not available for configuration in the website editor.
It is also possible to add ribbons for specific product variants. To do so, go to and select a product. Click the Variants smart button, choose a variant, and add a ribbon in the Variant Ribbon field of the Sales section.
