库存盘点
In any warehouse management system, the recorded inventory counts in the database might not always match the actual inventory counts in the warehouse. Discrepancy between counts can be due to damage, human error, theft, or other factors. As such, inventory adjustments must be made to reconcile the differences, and ensure that the recorded counts in the database match the actual counts in the warehouse.
库存调整页面
To view the Inventory Adjustments page, navigate to .

The Inventory Adjustments page lists all products that are currently in stock.
注解
Only products with a quantity greater than zero are listed on the Inventory Adjustments page. To view product lines with zero current quantity, go to .
For each product line, the following information is listed:
Location: the specific location in the warehouse where a product is stored. This column is only visible if Storage Locations are enabled.
Favorite: identifies products that have been favorited.
Product: the product whose quantity is listed on the inventory adjustment line.
批次/序列号: 分配给所列特定产品的追踪标识符。它可以包含字母、数字或两者的组合。
注解
If a specific product has a quantity of more than 1.00 in stock, and more than one serial
number, or lot number, assigned to it, each uniquely-identified product is displayed on its own
product line with its own lot/serial number, displayed under the Lot/Serial Number
column.
Expiration Date: the date on which the goods with this serial number are due to expire.
Last Count Date: the last time the quantity was updated.
Package: the package containing the quantity listed.
手头数量: 数据库中当前记录的产品数量。
Unit: the unit of measure in which the product is measured. Unless otherwise specified (e.g., in Pounds or Ounces), the default UoM is Units.
Counted Quantity: the real quantity counted during an inventory count. This field is left blank by default but can be changed, depending on if it matches the On Hand Quantity or not.
差额: 库存调整后, :guilabel:`库存数量`与:guilabel:`已计算数量`之间的差额。每次库存调整后,差额都会自动计算。
预定日期: 应进行计数的日期。如果未另行指定,该日期将默认为当年的 12 月 31 日。
用户: 数据库中指定的清点人员。可以是实际清点库存的人,也可以是在数据库中应用清点的人。
小技巧
Additional columns are hidden by default. To reveal these columns, click the (adjust) icon to the far right of the form’s top row, and reveal any desired column by ticking the checkbox next to that option.
创建库存调整
To create a new inventory adjustment from the page, click New. Doing so creates a new, blank inventory adjustment line at the bottom of the page.
小技巧
Inventory adjustments can also be created from the Forecasted Report on an individual product record. To open the report, navigate to a product record and click the Forecasted smart button. Then, at the top of the page, click Update Quantity, then New.

On this blank inventory adjustment line, click the drop-down menu under the Product column, and select a product. If the selected product is tracked using either lots or serial numbers, the desired lot or serial number needs to be chosen from the drop-down menu under the Lot/Serial Number column.
小技巧
The inventory adjustment line can also be used to create or record lots and serial numbers.
然后,将 计算数量 列中的值设置为库存调整过程中该产品的计算数量。
To the right of the Counted Quantity column, the Scheduled Date and User can also be changed via their respective drop-down menus. Changing the Scheduled Date changes the date that the inventory adjustment should be processed on, and selecting a responsible User assigns a user to the specific inventory adjustment for traceability purposes.
对新的库存调整行进行所有更改后,点击离开该行。这样做可以保存调整,并将该行移到页面顶部。
If the Counted Quantity is greater than the On Hand Quantity, the value in the Difference column is green. If the Counted Quantity is less than the On Hand Quantity, the value in the Difference column is red. If the quantities match, and have not been changed at all, no value appears in the Difference column.

在此阶段,已记录计数(库存调整),但尚未应用。这意味着调整前的库存数量尚未更新,以与新的实际计算数量相匹配。
Apply adjusted count
Inventory adjustments can be completed in several ways. The first way is to click the Apply button on the line at the far right of the page. The second way is to tick the checkbox on the far left of the line. Doing so reveals new button options at the top of the page, one of which is an Apply button. Clicking this button instead causes an Inventory Adjustment pop-up window to appear.
From this pop-up menu, a reference or reason can be assigned to the inventory adjustment. By default, the Inventory Reason field is pre-populated with today’s date, the date the adjustment is being made on, but can be changed to reflect whatever reference or reason is desired.
准备就绪后,点击 应用 ,以应用库存调整。
注解
同时应用库存调整会在 仓库操作明细 报告中创建 库存移动行(SML) 以进行追踪。

Relocate products
Inventory adjustments can also be used to relocate products to different storage locations, or to different packages. To relocate a product, tick the checkbox at the far left of the line for the desired product. At the top of the page, click the Relocate button. Doing so opens a pop-up.

On the resulting pop-up, enter the following information:
To Location: the new location for the products.
To Package: the new package for the products.
Reason for relocation: the reason for the move.
重要
Product relocations only work on internal locations. Products cannot be moved between companies.
Only users with Administrator rights can perform product relocations.
Set to zero
Inventory adjustments can also be used to clear inventory counts by setting the quantity to zero. To do this, tick the checkbox at the far left of the line for the desired product. At the top of the page, click the Actions button to open a drop-down menu. Click Set to 0. Once this is complete, apply the adjusted count.
Count products
Counting products is a recurring activity in a warehouse. Once a count is complete, go to to update the Counted Quantity column for each product line.
On each product line, identify whether the value in the On Hand Quantity column recorded in the database matches the newly-counted value. If the recorded value and the counted value do match, click the Set icon at the far right of the product line.
Doing so copies the value from the On Hand Quantity column over to the
Counted Quantity column, and sets the value of the Difference column to
0.00. Subsequently, once applied, an inventory move with 0.00 Quantity Done is
recorded in the product’s inventory adjustment history.

If the newly-counted value for a given product does not match the value in the On Hand Quantity recorded in the database, instead of clicking the Set icon, record the real value in the field in the Counted Quantity column.
To do so, click the field in the Counted Quantity column on the specific inventory
adjustment line for the product whose count is being changed. This automatically assigns a
Counted Quantity of 0.00.
To change this value, type in a new value that matches the real, newly-counted value. Then, click away from the line. Doing so saves the adjustment, and automatically adjusts the value in the Difference column.
If the Counted Quantity is greater than the On Hand Quantity, the value in the Difference column is green. If the Counted Quantity is less than the On Hand Quantity, the value in the Difference column is red. If the quantities match, and have not been changed at all, no value appears in the Difference column.
Subsequently, once applied, a move with the difference between the On Hand Quantity and the Counted Quantity is recorded in the product’s inventory adjustment history.

The Actions menu appears when one or more products’ checkboxes are selected. The Actions menu includes the option to Set to quantity on hand, which sets the selected products’ Counted Quantity to the On Hand Quantity, and Set to 0, which sets the selected products’ Counted Quantity to zero.

重要
Sometimes a count occurs, but cannot be applied in the database right away. In the time between the actual count and applying the inventory adjustment, product moves can occur. In that case, the on-hand quantity in the database can change and no longer be consistent with the counted quantity. As an extra precaution, Odoo asks for confirmation before applying the inventory adjustment.
Revert an inventory adjustment
To revert the changes made in an inventory adjustment, navigate to .
Tick the checkbox at the far left of the line for the desired product. At the top of the page, click the Actions button to open a drop-down menu, and click Revert Inventory Adjustment.
注解
After an inventory adjustment is reverted, the line is not removed from the Moves
History report. Instead, an additional line is added, this time with the word [reverted] added
to the Reference column.

更改库存清点频率
By default, the scheduled date for inventory adjustments are always scheduled for the 31st of December of the current year. However, for some companies, it is crucial that they have an accurate inventory count at all times. In such cases, the default scheduled date can be modified.
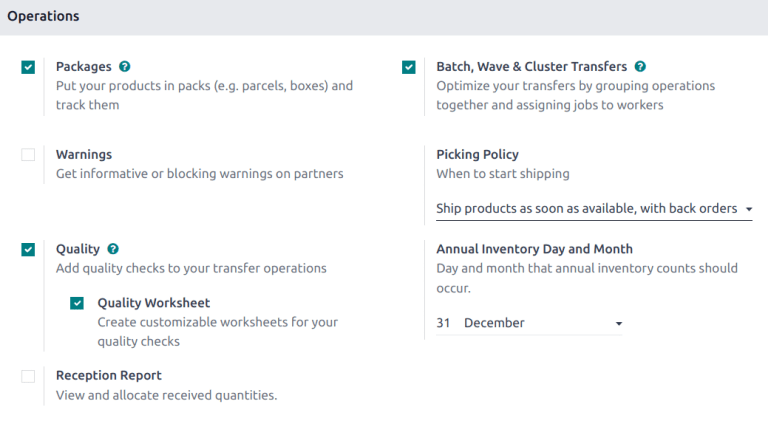
To modify the default scheduled date, go to . Then, in the Operations section, locate the Annual Inventory Day
and Month setting, which includes a drop-down menu that is set to 31 December by default.

To change the day, click the 31, enter a number from 1-31, depending on the desired month of the
year.
如要更改月份,请单击 12 月 显示下拉菜单,并选择所需的月份。
Once all desired changes have been made, click Save to save all changes.
Plan big inventory counts
To plan big inventory counts, such as a full count of everything currently in stock, first navigate to .
Then, select the desired products to be counted by ticking the checkbox on the far left of each product line.
小技巧
To request a count of all products currently in stock, tick the checkbox at the top of the table, in the header row next to the Location label. This selects all product lines.

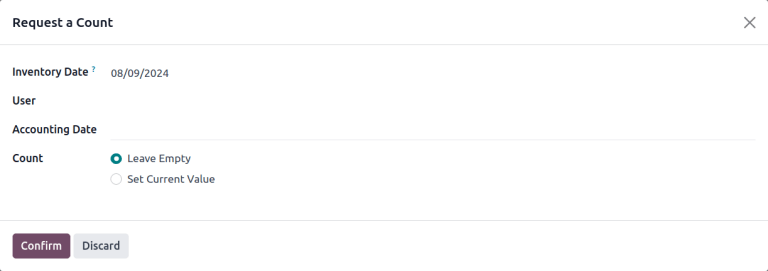
Once all desired products have been selected, click the Request a Count button at the top of the page. Doing so opens the Request a Count pop-up window, where the following information can be filled:
Inventory Date: the planned date of the count.
User: the user responsible for the count.
Accounting Date: the date at which the inventory adjustment will be accounted.
Count: to leave the on-hand quantity of each product line blank, select Leave Empty. To pre-fill the on-hand quantity of each product line with the current value recorded in the database, select Set Current Value.
注解
The Leave Empty option forces the employee conducting the audit to manually type in the number they counted, while the Set Current Value option only requires the employee to verify the counted quantity and click Apply.
Finally, once ready, click Confirm to request the count.

重要
In the Odoo Barcode app, users can only view inventory counts that are assigned to them, and are scheduled for today or earlier.
Sometimes a count occurs, but cannot be applied in the database right away. In the time between the actual count and applying the inventory adjustment, product moves can occur. In that case, the on-hand quantity in the database can change and no longer be consistent with the counted quantity. As an extra precaution, Odoo asks for confirmation before applying the inventory adjustment.
Adjustment history
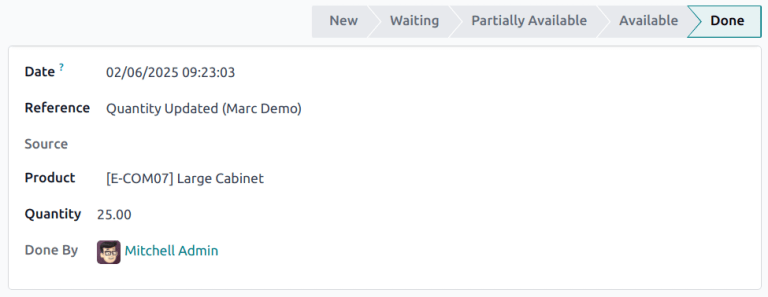
Details regarding inventory adjustment can be viewed by clicking the History icon.
The user who performed the count is listed in parenthesis in the Reference field, while the user who applied the count is listed in the Done By.

Inventory audit
An inventory audit can be accessed from the Inventory Adjustment page. This audit includes an inventory record both before and after a count is completed, to track what changed.
On the Inventory Adjustment page, tick the checkbox at the top-left of the page to select all of the lines. Then click the Request a Count button. On the pop-up, set Count to Set Current Value, then click Confirm.
After returning to the Inventory Adjustment page, select all of the lines again. Click . The Count Sheet exports in PDF form.
更多内容
