管理
休假和分配申请在批准之前需要经过审批程序。申请需要一次或两次审批(如有),这取决于如何配置具体的休假类型。所有这些配置都可以在 休假 应用程序的 管理 部分找到。
只有可以批准分配和休假申请的人员才能在 休假 应用程序中看到 管理 部分。
管理休假
要查看需要批准的休假申请,请导航至 。这样就会显示 所有休假 页面。
此页面上唯一可见的请假申请属于用户在 休假 应用程序中拥有 休假负责人 或 管理员 访问权限的雇员。
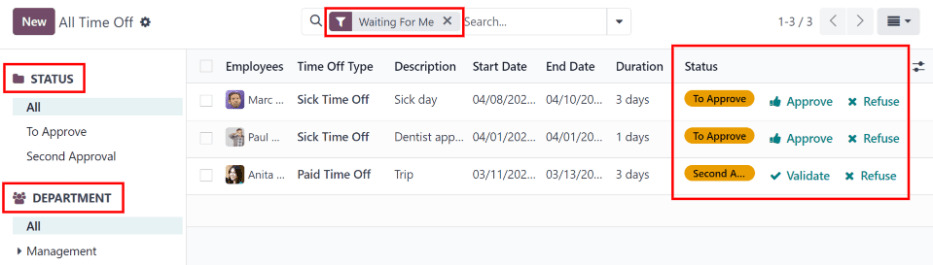
The default filter on the All Time Off page is Waiting For Me.
此过滤器仅显示用户团队中当前员工需要审批的休假请求,状态为 待审批 或 二次审批 。
在 所有休假 页面的左侧,有各种分组选项可以用来缩小显示的休假请求范围,这些选项位于 状态 和 部门 标题下方。
由于只显示需要审批的休假请求,因此 状态 选项只有 全部 、 待审批 和 二次审批 。
用户所属并管理员工的各个部门也会显示在页面左侧的 部门 下。
Note
如果没有任何请求属于某个状态选项或部门,则该状态或部门不会在左侧菜单中显示。
要仅显示特定部门的休假请求,请点击页面左侧的 部门 。然后只会显示所选部门内的请求。
状态列显示每个请求的状态,并以特定颜色突出显示。
待审批 和 二次审批 请求以黄色高亮显示,并且默认情况下只有这些请求会出现在列表中。
如果移除 等待我处理 过滤器,所有状态都会显示。
已批准 请求以绿色高亮显示, 待提交 (草稿)请求以蓝色高亮显示, 已拒绝 请求以灰色高亮显示。
要批准一个休假请求,请点击行末的 批准 按钮。
要验证一个已经批准且正在等待第二次批准的休假请求,请点击行末的 验证 按钮。
要拒绝一个请求,请点击行末的 拒绝 按钮。
要查看更多详细信息,请点击休假请求行的任意位置(除了 批准 、 验证 图标和 拒绝 按钮)。这样做会加载该特定休假请求表单。根据用户的权限,可以进行修改。
要修改请求,请在表单中进行任何所需的更改。所有更改都会自动保存。
也可以从这个表单中批准、验证或拒绝请求。点击 批准 按钮来批准, 验证 按钮来验证,或 拒绝 按钮来拒绝请求。
管理分配
要查看需要批准的分配,请导航到 。这样做会显示 分配 页面。
用户只会看到他们在 休假 应用中具有 休假专员 或 管理员 权限的员工的分配。
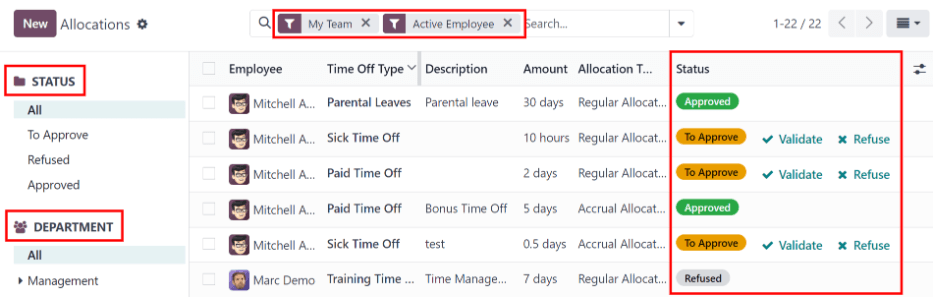
分配 页面上配置的默认筛选器是 我的团队 和 在职员工 。这些默认筛选器 仅 显示用户团队中的员工(他们管理的员工)和在职员工。非在职记录不会显示。
分配 页面的左侧有各种分组选项,可以缩小显示的分配请求范围。
状态 选项包括: 全部 、 待审批 、 已拒绝 和 已批准 。点击特定的 状态 可以仅查看具有该特定状态的请求。
要查看所有分配请求,无论其状态如何,请点击 全部 在 状态 标题下。
也可以按部门显示分配请求。点击 分配 页面左侧的所需 部门 ,以仅显示该特定部门的分配。
Note
左侧的分组**仅**显示符合 我的团队 和 在职员工 默认过滤条件的分配请求,如果这些默认过滤条件未从 搜索… 栏中移除。左侧仅显示符合这些过滤条件的分配请求的状态。
例如,如果没有状态为 待提交 的请求,该状态选项将不会出现在 分配 页面的左侧。
用户员工的所有部门都会出现在列表中。如果没有任何符合预配置过滤条件的该部门的分配请求,列表将为空。
始终可以通过点击特定过滤条件旁边的 (移除) 图标来移除任何预配置的过滤条件。
状态列显示每个请求的状态,并以特定颜色突出显示。
待审批 的请求以黄色高亮显示, 已批准 的请求以绿色高亮显示,而 已拒绝 的请求以灰色高亮显示。
要批准一个分配请求,请点击行尾的 验证 按钮。要拒绝一个请求,请点击 拒绝 按钮。
如果需要更多详细信息,请点击分配请求行的任意位置( 验证 或 拒绝 按钮除外),以通过分配请求表单查看具体请求的详细信息。
根据用户的权限,可以对出现的分配请求表单进行更改。要修改请求,请在表单中进行所需的任何更改。所有更改都会自动保存。
也可以从该表单中批准或拒绝请求。点击 验证 按钮以批准,或点击 拒绝 按钮以拒绝请求。
