Owl 组件
Odoo JavaScript 框架使用一个名为 Owl 的自定义组件框架。它是一个声明式组件系统,设计上大致借鉴了 Vue 和 React。组件使用 QWeb 模板 定义,并加入一些 Owl 特有的指令。官方 Owl 文档 包含完整的参考手册和教程。
Important
尽管代码位于 web 模块中,但它是在一个独立的 GitHub 仓库中维护的。因此,对 Owl 的任何修改都应通过 https://github.com/odoo/owl 上的拉取请求(pull request)进行。
Note
目前,所有 Odoo 版本(从版本 14 开始)都使用相同的 Owl 版本。
使用 Owl 组件
Owl documentation 已详细介绍了 Owl 框架,因此本页仅提供 Odoo 特有的信息。但首先,让我们看看如何在 Odoo 中创建一个简单的组件。
import { Component, xml, useState } from "@odoo/owl";

class MyComponent extends Component {
    static template = xml`
        <div t-on-click="increment">
            <t t-esc="state.value">
        </div>
    `;

    setup() {
        this.state = useState({ value: 1 });
    }

    increment() {
        this.state.value++;
    }
}
该示例表明,Owl 作为一个名为 owl 的库在全局命名空间中可用:可以像 Odoo 中的大多数库一样直接使用它。注意,这里我们将模板定义为静态属性,但没有使用 static 关键字,因为某些浏览器不支持该关键字(Odoo JavaScript 代码应符合 Ecmascript 2019 规范)。
这里我们借助 xml 辅助函数在 JavaScript 代码中定义模板。但这只适合入门。在实践中,Odoo 的模板应定义在 xml 文件中,以便进行翻译。在这种情况下,组件只需定义模板名称即可。
在实践中,大多数组件应定义 2 到 3 个文件,且位于同一位置:一个 JavaScript 文件(my_component.js)、一个模板文件(my_component.xml),以及可选的 scss(或 css)文件(my_component.scss)。然后应将这些文件添加到某个资源包(assets bundle)中。Web 框架会负责加载 javascript/css 文件,并将模板加载到 Owl 中。
上述组件应按如下方式定义:
import { Component, useState } from "@odoo/owl";

class MyComponent extends Component {
    static template = 'myaddon.MyComponent';

    ...
}
模板现在位于对应的 xml 文件中:
<?xml version="1.0" encoding="UTF-8" ?>
<templates xml:space="preserve">

<t t-name="myaddon.MyComponent">
  <div t-on-click="increment">
    <t t-esc="state.value"/>
  </div>
</t>

</templates>
Note
模板名称应遵循 addon_name.ComponentName 命名约定。
更多内容
最佳实践
首先,组件是类,因此它们有构造函数。但构造函数在 JavaScript 中是一种特殊方法,无法以任何方式重写。由于这在 Odoo 中偶尔是有用的模式,我们需要确保 Odoo 中没有任何组件直接使用 constructor 方法,而应使用 setup 方法:
// correct:
class MyComponent extends Component {
    setup() {
        // initialize component here
    }
}

// incorrect. Do not do that!
class IncorrectComponent extends Component {
    constructor(parent, props) {
        // initialize component here
    }
}
另一个良好实践是为模板名称使用一致的命名约定:addon_name.ComponentName。这可以避免 Odoo 插件之间的名称冲突。
参考列表
Odoo web 客户端使用 Owl 组件构建。为了方便使用,Odoo JavaScript 框架提供了一套通用组件,可在一些常见场景中复用,例如下拉框、复选框或日期选择器。本页介绍如何使用这些通用组件。
技术名称 |
简介 |
|---|---|
一个滑动组件,用于在触摸滑动时执行操作 |
|
一个简单的复选框组件,旁边带有标签 |
|
可供选择的颜色列表 |
|
功能齐全的下拉菜单 |
|
使用选项卡在页面之间导航的组件 |
|
用于处理分页的小组件 |
|
用于在不同选项之间进行选择的下拉组件 |
|
以圆角胶囊样式显示的标签列表 |
ActionSwiper
位置
@web/core/action_swiper/action_swiper
说明
这是一个当元素被水平滑动时可以执行操作的组件。swiper 会包裹一个目标元素并为其添加操作。当用户滑动超过其宽度的指定比例并松开时,操作就会被执行。
<ActionSwiper onLeftSwipe="Object" onRightSwipe="Object">
  <SomeElement/>
</ActionSwiper>
如上所示,使用该组件最简单的方式是在 xml 模板中直接将它包裹在目标元素外面。但有时,您可能想扩展现有元素而不想复制模板。这完全可以做到。
如果想扩展现有元素的行为,必须通过直接包裹的方式将该元素放在其中。此外,还可以有条件地添加 props,以控制元素何时可以滑动、其动画以及执行操作所需滑动的最小比例。
您可以使用该组件轻松地与记录、消息、列表项等进行交互。

以下示例创建了一个基本的 ActionSwiper 组件。这里,双向滑动均已启用。
<ActionSwiper
  onRightSwipe="
    {
      action: '() => Delete item',
      icon: 'fa-delete',
      bgColor: 'bg-danger',
    }"
  onLeftSwipe="
    {
      action: '() => Star item',
      icon: 'fa-star',
      bgColor: 'bg-warning',
    }"
>
  <div>
    Swipable item
  </div>
</ActionSwiper>
Note
在使用从右到左(RTL)语言时,操作会对调。
Props(属性)
名称 |
类型 |
说明 |
|---|---|---|
|
|
可选布尔值,用于确定滑动过程中是否带有位移效果 |
|
|
可选动画,在滑动结束后使用( |
|
|
如果提供,actionswiper 可以向左滑动 |
|
|
如果提供,actionswiper 可以向右滑动 |
|
|
可选的最小宽度比例,必须滑动超过该比例才会执行操作 |
您可以同时使用 onLeftSwipe 和 onRightSwipe 这两个 props。
用于左/右滑动的 Object 必须包含:
action,即可作为回调使用的Function。一旦在给定方向完成滑动,就会执行该操作。
icon是要使用的图标类,通常用于表示该操作。必须为string。
bgColor是用于装饰操作的背景颜色。可以是以下 bootstrap 情境色 之一(danger、info、secondary、success或warning)。必须提供这些值,以定义 swiper 的行为和外观。
示例:扩展现有组件
在下面的示例中,可以使用 xpath 将现有元素包裹在 ActionSwiper 组件中。这里,添加了一个 swiper,用于在 mail 中将消息标记为已读。
<xpath expr="//*[hasclass('o_Message')]" position="after">
  <ActionSwiper
    onRightSwipe="messaging.device.isMobile and messageView.message.isNeedaction ?
      {
        action: () => messageView.message.markAsRead(),
        icon: 'fa-check-circle',
        bgColor: 'bg-success',
      } : undefined"
  />
</xpath>
<xpath expr="//ActionSwiper" position="inside">
  <xpath expr="//*[hasclass('o_Message')]" position="move"/>
</xpath>
CheckBox
位置
@web/core/checkbox/checkbox
说明
这是一个简单的复选框组件,旁边带有标签。复选框与标签相互关联:点击标签时,复选框的状态会切换。
<CheckBox value="boolean" disabled="boolean" t-on-change="onValueChange">
  Some Text
</CheckBox>
Props(属性)
名称 |
类型 |
说明 |
|---|---|---|
|
|
如果为 true,复选框被勾选,否则为未勾选 |
|
|
如果为 true,复选框被禁用,否则为启用状态 |
ColorList
位置
@web/core/colorlist/colorlist
说明
ColorList 允许您从预定义的列表中选择一种颜色。默认情况下,该组件显示当前选中的颜色,并且在提供 canToggle props 之前不可展开。不同的 props 可以改变其行为:让列表始终展开,或让它在点击后作为切换器,显示可用颜色列表直到做出选择。
Props(属性)
名称 |
类型 |
说明 |
|---|---|---|
|
|
可选。colorlist 是否可以在点击时展开列表 |
|
|
要在组件中显示的颜色列表。每种颜色都有一个唯一的 |
|
|
可选。如果为 true,列表始终展开 |
|
|
可选。如果为 true,列表默认展开 |
|
|
选择颜色后执行的回调 |
|
|
可选。所选颜色的 |
颜色 id 如下:
Id |
颜色 |
|---|---|
|
|
|
|
|
|
|
|
|
|
|
|
|
|
|
|
|
|
|
|
|
|
|
|
Dropdown
位置
@web/core/dropdown/dropdown and @web/core/dropdown/dropdown_item
说明
Dropdown 允许您在点击切换器时显示一个包含项目列表的菜单。它可以与 DropdownItem 结合使用,在选择项目时调用回调并关闭菜单。
Dropdown 是出人意料地复杂的组件,它们提供的功能列表如下:
点击时切换项目列表的显示
点击外部时关闭
选择项目时调用函数
可选择在选择项目时关闭项目列表
SIY:样式由您自己定制
支持任意层级的子下拉菜单
可配置的热键,用于打开/关闭下拉菜单或选择下拉项目
键盘导航(方向键、tab、shift+tab、home、end、enter 和 escape)
在页面滚动或调整大小时自动重新定位
智能选择打开方向(自动处理从右到左方向)。
同级相邻下拉菜单:当其中一个打开时,悬停即可切换其他菜单
要正确使用 <Dropdown/> 组件,需要填充两个 OWL 插槽:
default插槽:包含下拉菜单的 toggle (切换)元素。默认情况下,点击事件会绑定到该元素上,用于打开和关闭下拉菜单。content插槽:包含下拉菜单本身的 elements (元素),并渲染在弹出框内。虽然不是必须的,但您可以在这个插槽中放入一些DropdownItem,当这些项目被选中时,下拉菜单会自动关闭。
<Dropdown>
  <!-- The content of the "default" slot is the component's toggle -->
  <button class="my-btn" type="button">
    Click me to toggle the dropdown menu!
  </button>

  <!-- The "content" slot is rendered inside the menu that pops up next to the toggle -->
  <t t-set-slot="content">
    <DropdownItem onSelected="selectItem1">Menu Item 1</DropdownItem>
    <DropdownItem onSelected="selectItem2">Menu Item 2</DropdownItem>
  </t>
</Dropdown>
Dropdown Props(属性)
名称 |
类型 |
说明 |
|---|---|---|
|
|
可选,添加到下拉菜单上的类名 |
|
|
可选,如果为 true,则禁用下拉菜单,用户将无法再打开它。(默认: |
|
|
可选,要在下拉菜单中显示为 DropdownItem 的项目列表 |
|
|
可选,定义菜单打开位置的偏好设置。RTL 方向会自动处理。应为有效的 usePosition 钩子位置。(默认: |
|
|
可选函数,在打开前调用。可以是异步的。 |
|
|
可选函数,在打开后立即调用。 |
|
|
可选函数,在打开或关闭后调用(传入一个布尔值作为唯一参数,表示下拉菜单是否处于打开状态)。 |
|
|
可选对象,包含 |
|
|
可选,为 true 时,Dropdown 组件不会为切换按钮添加点击事件监听器。这样可以更灵活地控制下拉菜单何时打开。(应与 |
|
|
可选,覆盖下拉菜单的导航选项(参见 |
|
|
可选,为 true 时,在鼠标悬停在菜单上期间保持 Dropdown 菜单位置不变,在菜单内容变化时提供更好的用户体验。 |
|
|
可选,允许获取下拉菜单的 ref(期望传入由 |
DropdownItem 属性
名称 |
类型 |
说明 |
|---|---|---|
|
|
可选值,添加到根 span 的 classname 中(同时支持字符串和 OWL classname 对象表示法)。 |
|
|
可选函数,在选中下拉菜单项时调用。 |
|
|
可选,控制选中该项时应关闭哪个父下拉菜单: |
|
|
可选对象,表示添加到根元素上的属性。 |
Important
在为组件编写自定义 css 时,别忘了菜单元素并不位于切换按钮旁边,而是位于覆盖层容器内,即文档的底部。因此,请使用 menuClass 和 class 属性来更轻松地编写您的选择器。(这一 DOM 处理方式让我们避免了许多 z-index 问题。)
嵌套下拉菜单
Dropdown 可以嵌套,只需将新的 Dropdown 组件放在其他下拉菜单的 content 插槽中即可。当父下拉菜单打开时,子下拉菜单会在鼠标悬停时自动打开。
默认情况下,选中一个 DropdownItem 会关闭整棵 Dropdown 树。
Example
本示例展示如何制作嵌套的 File 下拉菜单,并为 New 下的子元素提供子菜单。
<Dropdown>
  <button>File</button>
  <t t-set-slot="content">
    <DropdownItem onSelected="() => this.onItemSelected('file-save')">Save</DropdownItem>
    <DropdownItem onSelected="() => this.onItemSelected('file-open')">Open</DropdownItem>

    <Dropdown>
      <button>New</button>
      <t t-set-slot="content">
        <DropdownItem onSelected="() => this.onItemSelected('file-new-document')">Document</DropdownItem>
        <DropdownItem onSelected="() => this.onItemSelected('file-new-spreadsheet')">Spreadsheet</DropdownItem>
      </t>
    </Dropdown>
  </t>
</Dropdown>
在下面的示例中,我们递归调用一个模板来展示树形结构。
<t t-name="addon.MainTemplate">
  <div>
    <t t-call="addon.RecursiveDropdown">
      <t t-set="name" t-value="'Main Menu'" />
      <t t-set="items" t-value="state.menuItems" />
    </t>
  </div>
</t>

<t t-name="addon.RecursiveDropdown">
  <Dropdown>
    <button t-esc="name"></button>
    <t t-set-slot="content">
      <t t-foreach="items" t-as="item" t-key="item.id">

        <!-- If this item has no child: make it a <DropdownItem/> -->
        <DropdownItem t-if="!item.childrenTree.length" onSelected="() => this.onItemSelected(item)" t-esc="item.name"/>

        <!-- Else: recursively call the current dropdown template. -->
        <t t-else="" t-call="addon.RecursiveDropdown">
          <t t-set="name" t-value="item.name" />
          <t t-set="items" t-value="item.childrenTree" />
        </t>
      </t>
    </t>
  </Dropdown>
</t>
受控下拉菜单
如有需要,您还可以通过代码打开或关闭下拉菜单。为此,您必须使用 useDropdownState 钩子以及 state 属性。useDropdownState 返回一个对象,该对象具有 open 和 close 方法(以及一个 isOpen getter)。将该对象传递给您想控制的下拉菜单的 state 属性,之后调用相应函数即可打开和关闭您的下拉菜单。
如果您不希望默认的点击事件处理器添加到切换按钮上,也可以将 manual 设为 true。
Example
下面的示例展示了一个下拉菜单,它在挂载时自动打开,且点击其中的按钮时只有 50% 的概率关闭。
import { Component, onMounted } from "@odoo/owl";
import { Dropdown } from "@web/core/dropdown/dropdown";
import { DropdownItem } from "@web/core/dropdown/dropdown_item";
import { useDropdownState } from "@web/core/dropdown/dropdown_hooks";

class MyComponent extends Component {

  static components = { Dropdown, DropdownItem };
  static template = xml`
    <Dropdown state="this.dropdown">
      <div>My Dropdown</div>

      <t t-set-slot="content">
        <button t-on-click="() => this.mightClose()">Close It!<button>
      </t>
    </Dropdown>
  `;

  setup() {
    this.dropdown = useDropdownState();

    onMounted(() => {
      this.dropdown.open();
    });
  }

  mightClose() {
    if (Math.random() > 0.5) {
      this.dropdown.close();
    }
  }
}
DropdownGroup
位置: @web/core/dropdown/dropdown_group
您可以使用 DropdownGroup 组件让多个 Dropdown 共享同一个群组,这意味着当其中一个 Dropdown 打开时,其他 Dropdown 会在鼠标悬停时自动打开,无需点击。
为此,既可以用一个 DropdownGroup 包住所有 Dropdown,也可以用具有相同 group 键的多个 DropdownGroup 分别包住它们。
Example
在下面的示例中,代码片段中的所有下拉菜单都共享同一个群组:
<DropdownGroup>
  <Dropdown>...</Dropdown>
  <Dropdown>...</Dropdown>
  <Dropdown>...</Dropdown>
</DropdownGroup>
而在下面的代码片段中,只有第一、第二和第四个下拉菜单共享同一个群组:
<DropdownGroup group="'my-group'">
  <Dropdown>...</Dropdown>
  <Dropdown>...</Dropdown>
</DropdownGroup>

<DropdownGroup group="'my-other-group'">
  <Dropdown>...</Dropdown>
</DropdownGroup>

<DropdownGroup group="'my-group'">
  <Dropdown>...</Dropdown>
</DropdownGroup>
Notebook
位置
@web/core/notebook/notebook
说明
Notebook 用于在选项卡式界面中显示多个页面。选项卡可以位于元素顶部以水平显示,也可以位于左侧以垂直布局显示。
有两种方式定义要实例化的 Notebook 页面:使用 slot,或传递专用的 props。
可以使用 isDisabled 属性禁用页面,该属性可直接设置在插槽节点上;如果 Notebook 通过 pages 属性使用,则可设置在页面声明中。一旦禁用,相应的选项卡将变灰并设为非活动状态。
Props(属性)
名称 |
类型 |
说明 |
|---|---|---|
|
|
可选。允许锚点导航到不可见选项卡内的元素。 |
|
|
可选。设置在组件根元素上的 classname。 |
|
|
可选。默认显示的页面 |
|
|
可选。选项卡中使用的图标列表。 |
|
|
可选。选项卡方向是 |
|
|
可选。页面更改后执行的回调函数。 |
|
|
可选。包含从模板填充的 |
Example
第一种方式是在组件的插槽中设置页面。
<Notebook orientation="'vertical'">
  <t t-set-slot="page_1" title="'Page 1'" isVisible="true">
    <h1>My First Page</h1>
    <p>It's time to build Owl components. Did you read the documentation?</p>
  </t>
  <t t-set-slot="page_2" title="'2nd page'" isVisible="true">
    <p>Wise owl's silent flight. Through the moonlit forest deep, guides my path to code</p>
  </t>
</Notebook>
另一种定义页面的方式是传递属性。如果某些页面共享相同的结构,这会很有用。首先为您可能使用的每个页面模板创建一个组件。
import { Component, xml } from "@odoo/owl";
import { Notebook } from "@web/core/notebook/notebook";

class MyTemplateComponent extends Component {
  static template = xml`
    <h1 t-esc="props.title" />
    <p t-esc="props.text" />
  `;
}

class MyComponent extends Component {
  static template = xml`
    <Notebook defaultPage="'page_2'" pages="pages" />
  `;

  get pages() {
    return [
      {
        Component: MyTemplateComponent,
        title: "Page 1",
        props: {
          title: "My First Page",
          text: "This page is not visible",
        },
      },
      {
        Component: MyTemplateComponent,
        id: "page_2",
        title: "Page 2",
        props: {
          title: "My second page",
          text: "You're at the right place!",
        },
      },
    ]
  }
}
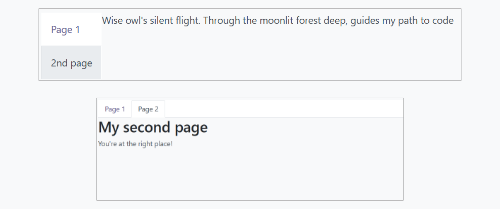
此处展示了这两个示例:
Pager
位置
@web/core/pager/pager
说明
Pager 是一个处理分页的小组件。页面由 offset 和 limit (页面大小)定义。它显示当前页面和元素 total 总数,例如 “9-12 / 20”。在前面的示例中,offset 为 8,limit 为 4,total 为 20。它有两个按钮(”Previous” 和 “Next”)用于在页面之间导航。
Note
Pager 可以在任何地方使用,但主要用于控制面板中。参见 usePager 钩子以操作控制面板的分页器。
<Pager offset="0" limit="80" total="50" onUpdate="doSomething" />
Props(属性)
名称 |
类型 |
说明 |
|---|---|---|
|
|
页面第一个元素的索引。从 0 开始,但分页器显示 |
|
|
页面大小。 |
|
|
页面可到达的元素总数。 |
|
|
页面被分页器修改时调用的函数。该函数可以是异步的,在其执行期间分页器不可编辑。 |
|
|
允许点击当前页面进行编辑(默认为 |
|
|
为上一页按钮绑定快捷键 |
位置
@web/core/select_menu/select_menu
说明
当您想实现的功能超出原生 select 元素所能提供的范围时,可以使用此组件。您可以定义自己的选项模板,从而在选项之间进行搜索,或将它们分组到子部分中。
Note
请优先使用原生 HTML select 元素,因为它默认提供无障碍功能,并且在移动设备上拥有更好的用户界面。此组件专为更复杂的使用场景而设计,用于克服原生元素的局限性。
Props(属性)
名称 |
类型 |
说明 |
|---|---|---|
|
|
可选。要在下拉菜单中显示的 |
|
|
可选。设置在 SelectMenu 组件根元素上的 classname。 |
|
|
可选。 |
|
|
可选。启用多选。启用多选后,选中的值会以 tag 的形式显示在 SelectMenu 输入框中。 |
|
|
可选。设置在切换按钮上的 classname。 |
|
|
可选。所选值是否可以取消选择。 |
|
|
可选。下拉菜单中是否显示搜索框。 |
|
|
可选。显示为搜索框占位符的文本。 |
|
|
可选。当前选中的值。可以是任意类型。 |
|
|
可选。选择某个选项时执行的回调函数。 |
choice 的结构如下:
value是选项的实际值。它通常是一个技术性字符串,但可以是any类型。
label是与选项关联的显示文本。它通常是更友好的已翻译string。
group 的结构如下:
choices是此组要显示的choice列表。
label是与组关联的显示文本。这是一个显示在组顶部的string。
Example
在下面的示例中,SelectMenu 将显示四个选项。其中一个显示在所有选项之上,因为它没有关联任何组,其余选项则按其所在组的标签分隔。
import { Component, xml } from "@odoo/owl";
import { SelectMenu } from "@web/core/select_menu/select_menu";

class MyComponent extends Component {
  static template = xml`
    <SelectMenu
      choices="choices"
      groups="groups"
      value="'value_2'"
    />
  `;

  get choices() {
    return [
        {
          value: "value_1",
          label: "First value"
        }
    ]
  }
  get groups() {
    return [
      {
          label: "Group A",
          choices: [
              {
                value: "value_2",
                label: "Second value"
              },
              {
                value: "value_3",
                label: "Third value"
              }
          ]
      },
      {
          label: "Group B",
          choices: [
              {
                value: "value_4",
                label: "Fourth value"
              }
          ]
      }
    ]
  }
}
您还可以使用相应的组件 slot 来自定义切换按钮的外观并为选项设置自定义模板。
<SelectMenu
  choices="choices"
  groups="groups"
  value="'value_2'"
>
  Make a choice!
  <t t-set-slot="choice" t-slot-scope="choice">
    <span class="coolClass" t-esc="'👉 ' + choice.data.label + ' 👈'" />
  </t>
</SelectMenu>
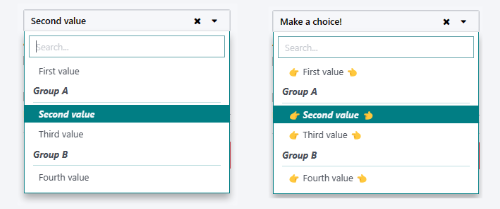
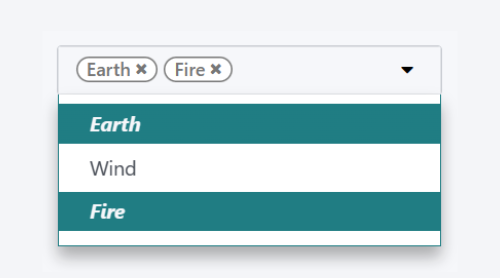
当 SelectMenu 用于多选时,value 属性必须是一个 Array,包含所选选项的值。
对于更高级的使用场景,您可以使用 bottomArea 插槽自定义下拉菜单的底部区域。这里我们选择显示一个按钮,其值为搜索输入框中设置的相应值。
<SelectMenu
    choices="choices"
>
    <span class="select_menu_test">Select something</span>
    <t t-set-slot="bottomArea" t-slot-scope="select">
        <div t-if="select.data.searchValue">
            <button class="btn text-primary" t-on-click="() => this.onCreate(select.data.searchValue)">
                Create this article "<i t-esc="select.data.searchValue" />"
            </button>
        </div>
    </t>
</SelectMenu>

位置
@web/core/tags_list/tags_list
说明
此组件可以在圆角胶囊(pill)中显示一组标签。这些标签既可以只是简单地列出若干值,也可以是可编辑的,允许移除条目。可以使用 itemsVisible prop 限制显示的条目数量。如果列表长度超过该限制,多余条目的数量会显示在最后一个标签旁的圆形中。
Props(属性)
名称 |
类型 |
说明 |
|---|---|---|
|
|
可选。是否将标签显示为徽章。 |
|
|
可选。是否随标签一同显示文本。 |
|
|
可选。列表中可见标签的数量上限。 |
|
|
传给组件的 |
tag 的结构如下:
colorIndex是可选的颜色 ID。
icon是可选的图标,显示在所显示文本的正前方。
id是标签的唯一标识符。
img是可选的图片,以圆形显示在所显示文本的正前方。
onClick是可选的回调函数,可赋给该元素。这使父元素能够根据被点击的标签处理相应的功能。
onDelete是可选的回调函数,可赋给该元素。它使从标签列表中移除条目成为可能,并且必须由父元素来处理。
text是与标签关联的所显示string。
Example
在下一个示例中,使用 TagsList 组件显示多个标签。标签被按下或删除按钮被点击时会发生什么,由开发者决定如何在父元素中处理。
import { Component, xml } from "@odoo/owl";
import { TagsList } from "@web/core/tags_list/tags_list";

class Parent extends Component {
  static template = xml`<TagsList tags="tags" />`;
  static components = { TagsList };

  setup() {
    this.tags = [{
        id: "tag1",
        text: "Earth"
    }, {
        colorIndex: 1,
        id: "tag2",
        text: "Wind",
        onDelete: () => {...}
    }, {
        colorIndex: 2,
        id: "tag3",
        text: "Fire",
        onClick: () => {...},
        onDelete: () => {...}
    }];
  }
}
根据赋予每个标签的属性不同,它们的外观和行为也会有所不同。