文档
通过 Odoo 说明文档 ,您可以在 Odoo 中存储、查看和管理文件。
文件夹和文档被组织成可从树中访问的部分。在左边。以下部分是可用的:
全部 : 显示用户有权访问的所有文件夹和文件。
公司 : 包含公司在内部共享的文件夹和文件。访问权限由为该文件夹和文件定义的 :ref:`访问权限 ` 决定。
我的驱动器 : 用户的个人工作空间,用于组织和访问他们拥有或上传的文件和文件夹。
与我共享 : 包括已与用户共享但不属于他们有权访问的任何父文件夹的文件。
最近 : 显示用户有权限查看或编辑的最近修改的文件。
回收站 : 存储 :ref:`已删除的文件和文件夹 ` 。
点击树中的某个部分以查看其内容。选择一个文件夹以打开它, 管理它 ,并访问其文件。
点击文件以打开它并 执行可用操作 `。要关闭文件,请按 **Esc** 键或点击 :icon:`fa-remove (关闭) 图标。您还可以通过拖放文件或文件夹将其移动到另一个文件夹或部分。
Tip
使用 :ref:`搜索栏 ` 快速查找特定项目。
讨论 ` 跟踪文件夹和文件的更改,并允许与内部用户和外部联系人进行沟通。点击视图右上角的 :icon:`fa-info-circle (信息与标签) 按钮以访问它。
更多内容
:doc:`签署文档 `
配置
删除延迟
默认情况下,移至回收站的项目会在30天后被永久删除。要调整此延迟,请转到 并编辑 删除延迟(天) 字段。
文件集中管理
为特定应用启用文件集中管理会自动将所有相关文件组织到专用文件夹中。要执行此操作,请转到 。例如,启用 人力资源 会使 HR 文档自动出现在 HR 文件夹中,而与薪资相关的文档则会自动出现在 薪资 子文件夹中。从下拉列表中选择所需的文件夹,并选择要添加到相关文件中的 :ref:`标签 `。
Tip
在集中管理会计文件时,点击 账簿 为各个账簿配置特定的子文件夹。
Note
更改文件夹或标签不会影响现有文件;更改仅适用于新创建的文件。
如果为某个应用启用了文件集中管理,那么在该应用中删除记录会将其附件移动到文档应用的回收站中。
文件夹
您可以在 公司 或 我的驱动器 部分的文件夹中组织文件。
要创建文件夹,请在树状结构中选择所需的分区,点击 新建 ,然后选择 文件夹 。在弹出窗口中,输入文件夹的 名称 ,然后点击 保存 。要创建子文件夹,请先选择父文件夹,然后按照相同的步骤操作。
Note
某些文件夹和子文件夹会根据 :ref:`文件集中管理设置 ` 自动创建。
要管理文件夹或子文件夹,请选择它并点击树状结构上方的 ( 操作 ) 图标。菜单中提供以下选项:
下载 : 将文件夹及其文件和子文件夹下载为.zip 文件。
重命名 : 修改文件夹的名称
共享 : :ref: `共享文件夹或管理其访问权限 `
添加快捷方式 : 此选项仅适用于子文件夹,允许创建子文件夹的快捷方式。
如果您有编辑权限,快捷方式将创建在相同的文件夹中。
如果您没有编辑权限,快捷方式将出现在 我的驱动器 部分。
然后您可以将其拖放到所需的文件夹中。
添加星标 :将文件夹标记为收藏以便更快访问。此设置是用户特定的,不会影响其他用户的工作区。然后您可以使用 :ref:`星标过滤器 ` 快速导航到您收藏的文件夹
信息和标签 :查看文件夹的 :ref:`详细信息 ` 和讨论。
选择后的操作 :定义文件夹中文件可用的服务器操作(作为按钮)。单击操作以添加或删除它。单击 添加自定义操作 以 :ref:`创建一个新的 `
Important
设置自定义操作和自动化规则可能会影响您的 `价格计划 ` _。
文件
要上传文件,请在树中选择所需的文件夹,单击 新建 并选择 上传 。
Tip
在 Odoo 在线数据库中,每个上传的文件不得超过 64MB。
您还可以将文件从计算机拖放到文档应用中的目标文件夹。
URL 链接
要添加一个 URL 链接(例如,一个视频)并使其可以从文件夹访问,请点击 新建 并选择 链接 。输入 URL ,添加一个 名称 ,并选择适当的 文件夹 。
电子表格
To create a spreadsheet, click New and select Spreadsheet.
Managing files
Several buttons are available in the top bar when opening a file:
the Action menu, which includes the options described below
Download
The following options are available in the Action menu:
Duplicate: Create a copy of the file.
Move to Trash: Move the file to the trash.
Rename
Info & tags: View the file’s details and chatter.
Create shortcut: A shortcut is a pointer to a file, allowing access from multiple folders without duplicating the file.
如果您有编辑权限,快捷方式将创建在相同的文件夹中。
如果您没有编辑权限,快捷方式将出现在 我的驱动器 部分。
然后您可以将其拖放到所需的文件夹中。
Manage versions: View all versions of the file in upload order, download a specific version, or upload a new one as needed.
Lock: Protect the file from any modifications.
Copy Links: Copy the file’s URL for sharing. Access is controlled based on the file’s access rights.
Split PDF: Split a PDF file.
Tip
You can use folder-specific email aliases to automatically save files sent to the alias into the corresponding folder.
Splitting and merging PDFs
To divide a PDF into individual or groups of pages, open the PDF and click Split PDF in the upper-right part of the document preview. Click the (scissors) icon between pages to remove a split if needed, then click Split to confirm.

To merge PDF files, follow these steps:
Navigate to the folder containing the files you want to merge, then switch to the list view and select the relevant files.
Click the Action button and select Merge PDFs.
If needed, click Add file to browse and select a PDF file from your computer.
Click the (scissors) icon between the files.
Click Split to merge them.
Note
The original PDFs are replaced by the merged version.
Tip
Press Shift + S to add or remove all splits between pages.
To delete a specific page, select the page, then click Delete.
Requesting files
Request files from users as a reminder for them to upload specific files. To do so, follow these steps:
Click New and select Request.
Enter a Document Name and select the person you’re requesting it from in the Request To field.
If needed, set a Due Date In, choose the Folder where the file should be added, add Tags, and write a Message.
Click Request.
A placeholder for the missing file is created in the selected folder. Once the file is available, click the placeholder to upload it.
Tip
You can also request a document from the list of scheduled activities.
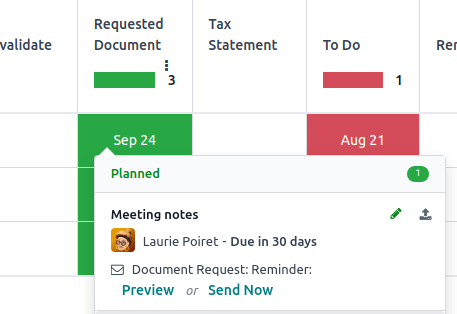
To see the list of all requested files, switch to the Activity view of the Documents app and go to the Requested Document column. Click a requested file’s date to view its details. You can then:
Upload a file using the (upload) button;
Edit the activity using the (edit) button;
Cancel the activity using the (cancel) button;
Send a reminder email. Click Preview to preview the content of the reminder email if needed, then Send Now.
To send a reminder email for all requested files, click the (ellipsis) icon in the Requested Document column and select Document Request: Reminder.
Details panel
To view a folder’s or file’s information and tags, select the folder or file, then click the (Info & Tags) button in the upper-right corner next to the view icons.
The details panel allows the following:
Change the file’s folder or the folder’s name.
View the file’s or folder’s size and the folder’s item count.
Change the file’s or folder’s Owner and Contact. By default, the person who creates a file or folder is set as its Owner and granted full access rights to it. To change it, select the required user from the dropdown list. The Contact is a person who only has Viewer access rights to the file or folder, e.g., an existing supplier in the database.
Note
To view a file from their user profile, a user must be set as the Contact and have at least Viewer access.
电子邮件别名
You can use an email alias to automatically save files sent to the email alias into a specific folder. To set up an email alias for a folder, follow these steps:
Select the folder where files should be saved.
Click the (Info & Tags) in the upper-right corner next to the view icons.
In the details panel, enter the desired Email alias and select or create the domain.
Optionally, specify an Activity type and assignee to create an activity when a file is received via the alias.
Optionally, select the Tags to automatically apply to the files created through the alias.
更多内容
Share and access rights
Note
You can only share folders and files and edit their access rights if you have editing rights.
Access rights can be set on:
folders: Select the folder, click the (gear) icon, and select Share.
files: Open the file and click Share in the top bar.
In the Share pop-up, grant access to specific users or contacts by selecting their name from the dropdown menu or by adding their email address manually, then select Viewer or Editor.
Tip
To remove a permission or set an expiration date for it, hover the mouse over the relevant contact and click the (remove) or (calendar) button, respectively.
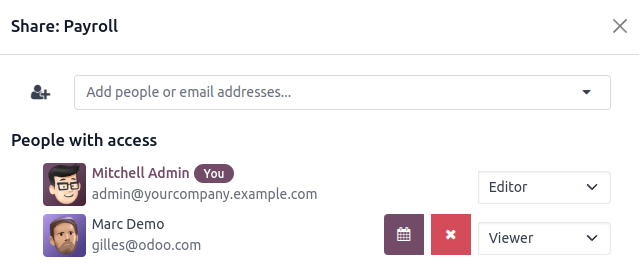
To set General access for Internal users or Anyone with the link, select Viewer, Editor, or None (to restrict access completely). For Anyone with the link, you can further specify whether the folder or file should be Discoverable (accessible through browsing) or require that users Must have the link to access it.
Note
Public users Must have the link to access a folder or file on the portal when connecting for the first time.
Each folder and file URL includes the access rights that have been set for it. When you share a folder, the person you share it with is directed to a dedicated portal where they can view the files in that folder, excluding any with restricted access.
Tip
Portal users can access folders and files they have permission to view or edit through the customer portal by clicking the Documents card.
File digitization with AI
Files available in the Finance folder can be digitized. Select the file, click Create Vendor Bill, Create Customer Invoice, or Create Customer Credit Note, then click Send for Digitization.
更多内容
